Quick answer: Plug your code scanner into the 16-pin diagnostic port under the driver-side dashboard while the ignition is off. Turn the ignition key to the run position without starting the engine to power the computer. Select the read codes menu option on the scanner screen and write down the stored trouble codes.
Never clear diagnostic trouble codes simply to hide an underlying problem or to pass an inspection. Avoid driving if your check engine light is flashing rapidly, or if critical brake and airbag warning indicators remain lit. Consult a certified professional mechanic whenever you feel uncertain about diagnosing or repairing a safety-critical vehicle system.
What Is OBD2 and Where Is the Port?
OBD2, or second-generation onboard diagnostics, is a standardized computer diagnostic system built into passenger vehicles, and its diagnostic port is located under the driver-side dashboard. Federal rules required this standard on all passenger cars and light trucks sold in the United States from the 1996 model year on. Older vehicles built before 1996 used first-generation onboard diagnostic systems that featured non-standard connectors and varying protocols.
Modern vehicles contain dozens of electronic sensors that monitor critical engine operations and emissions. These sensors continuously report data like air intake, coolant temperature, fuel delivery, and exhaust oxygen levels to the main engine control module. The engine control module acts as the central computer managing engine performance.
When a sensor reports readings outside normal operating parameters, the engine computer logs a diagnostic trouble code. If the abnormal condition persists across operating cycles, the computer turns on the dashboard check engine light. Reading this stored code tells you which system experienced an error before you start replacing parts.
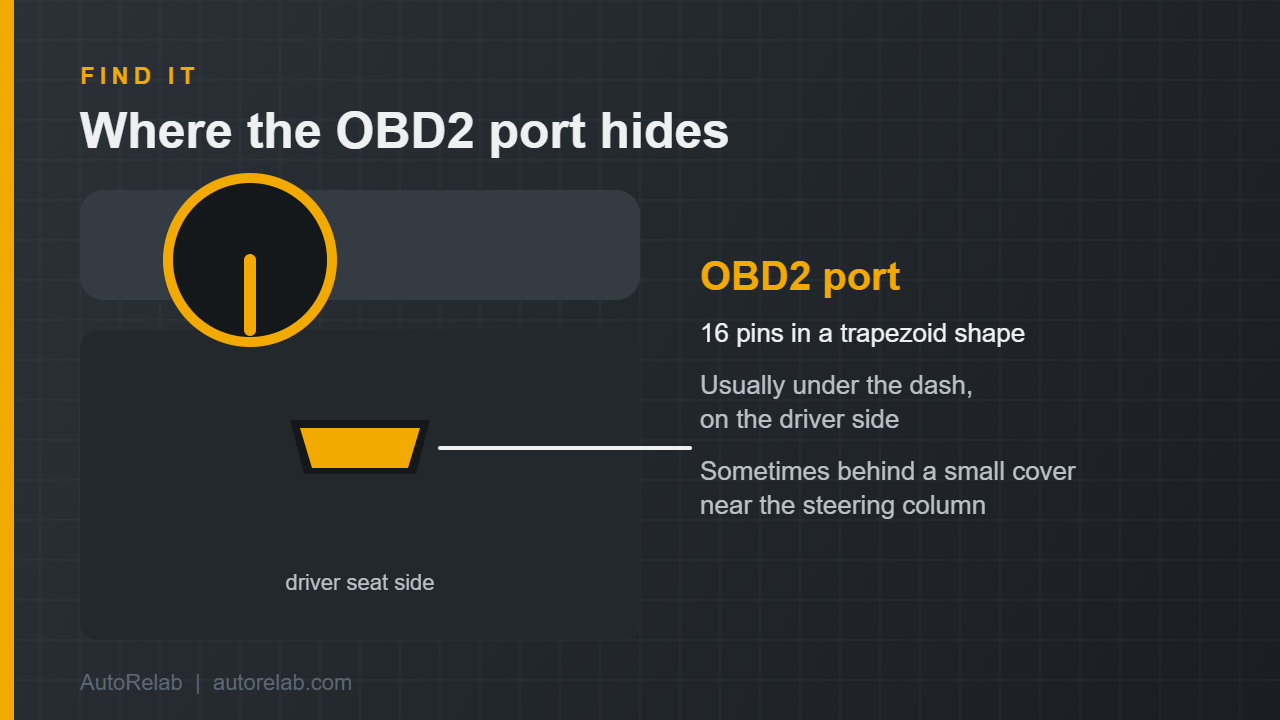
To read diagnostic codes, you must connect a scan tool to the vehicle data link connector. Federal standards require this diagnostic port to use a standardized 16-pin trapezoidal connector shape. This design ensures that any standard diagnostic tool can plug directly into the vehicle electronic system.
The diagnostic port is almost always located underneath the dashboard on the driver side of the vehicle cabin. Look along the lower edge of the dash, near the steering column, or close to the interior fuse box. The connector is placed within easy reach of the driver so technicians can get to it quickly.
Drivers can choose between handheld scan tools and compact wireless adapters to access the diagnostic port. Handheld code readers feature integrated display screens and navigation buttons powered directly by the vehicle port. Wireless adapters plug into the port and send diagnostic data over Bluetooth to an application on your smartphone.
What Do the Code Letters P, B, C and U Mean?
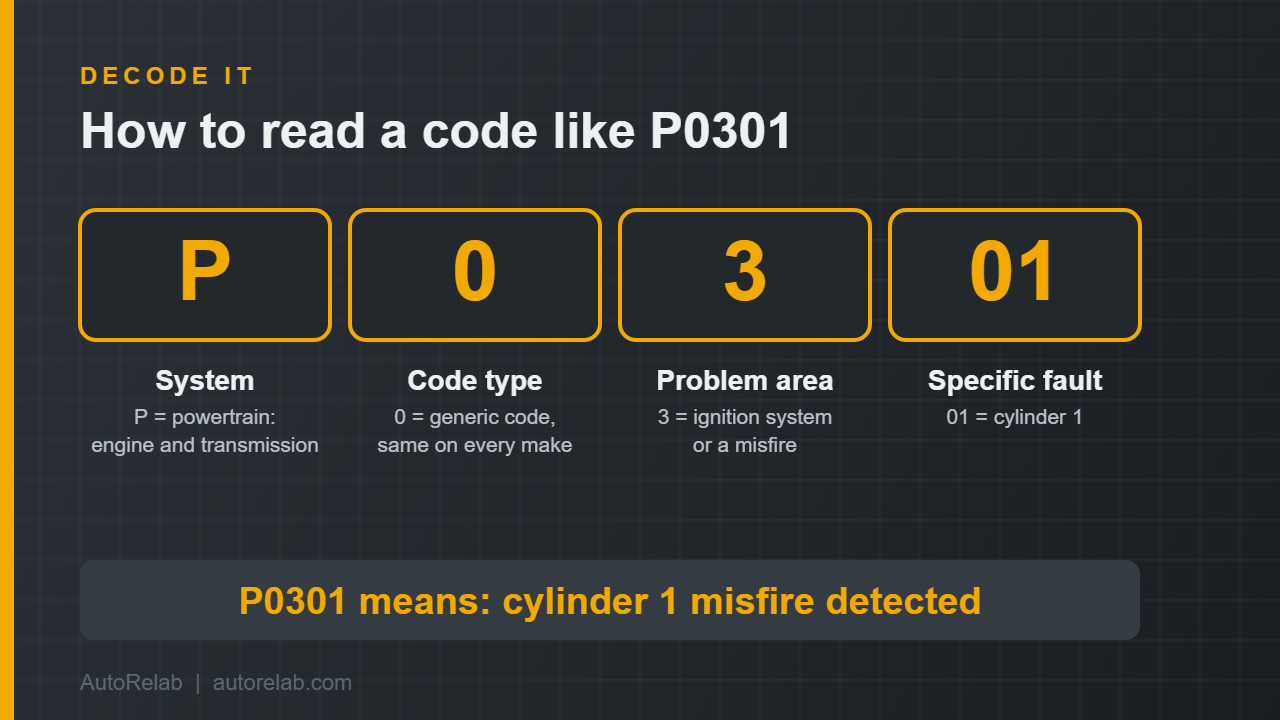
The code letters P, B, C, and U identify the specific vehicle system where the computer detected a fault: Powertrain, Body, Chassis, and Network integration. Diagnostic trouble codes use a standard five-character structure starting with a single letter followed by four numbers. Understanding this initial letter helps you isolate the affected system immediately.
The letter P stands for powertrain codes, which cover the engine, transmission, and associated emissions control systems. The powertrain control module monitors these components to ensure proper combustion and low tailpipe emissions. Common powertrain faults include engine misfires, catalyst efficiency issues, and intake air temperature sensor circuit errors.
Powertrain codes are the most frequent diagnostic warnings encountered by vehicle owners. For example, a cylinder misfire code indicates that the air and fuel mixture failed to ignite properly inside that cylinder. Another common powertrain code indicates that catalyst efficiency dropped below expected thresholds due to exhaust contamination or sensor failure.
The letter B stands for body codes, which cover electronic systems located inside the passenger compartment. Body control modules monitor equipment like supplemental restraint airbag systems, seat position sensors, climate controls, and power door locks. An illuminated airbag light on your dashboard often corresponds to a stored body diagnostic code.
The letter C stands for chassis codes, which cover mechanical and safety systems located outside the passenger cabin. Chassis diagnostics primarily monitor anti-lock braking systems, electronic stability control, and wheel speed sensors. Scanning chassis codes allows you to identify wheel speed sensor failures or historic brake system faults.
The letter U stands for network and integration codes, which monitor communication between different vehicle computers. Modern cars link multiple electronic modules together using a controller area network bus line. Network codes trigger when communication between modules drops or when signal transmission breaks down.
The four numbers following the system letter provide specific details about the nature of the fault. The second character indicates whether the code is a generic industry standard or a manufacturer-specific code. A zero in the second position represents a generic code, while a one indicates a manufacturer code.
The third digit pinpoints the specific vehicle subsystem, such as fuel metering or ignition. The final two digits identify the exact fault condition logged by the onboard computer.
How Do You Read an OBD2 Code, Step by Step?
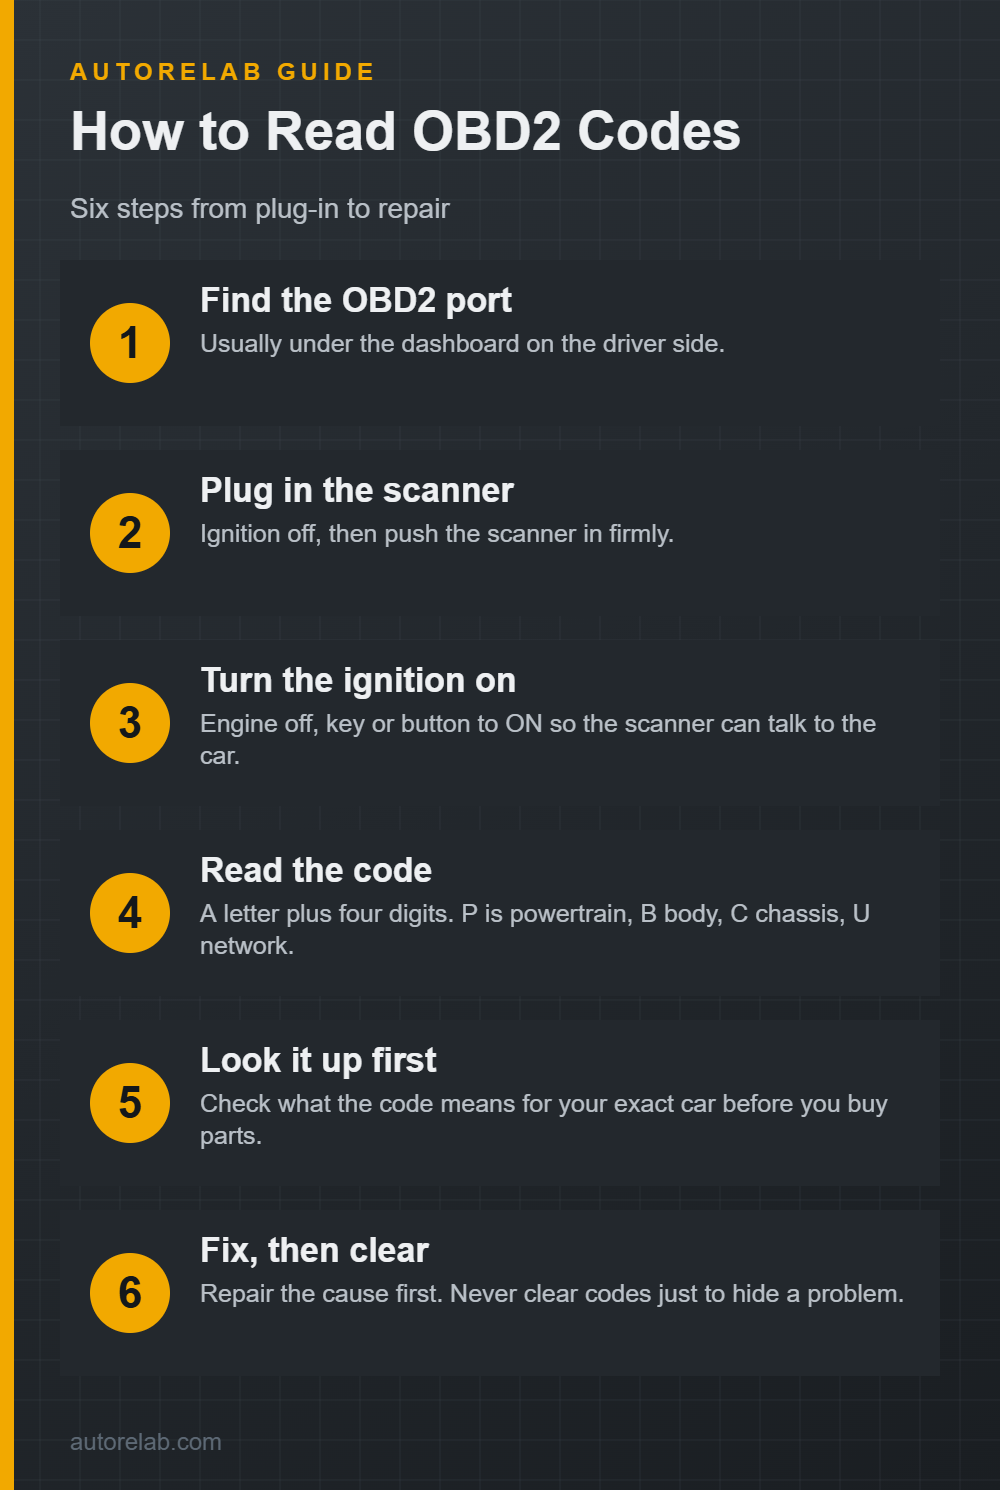
You read an OBD2 code by connecting a scanner with the ignition off and turning the key to the run position. Then select the read codes option and write down the results. Follow this simple step-by-step procedure to read diagnostic codes safely and accurately.
- Turn off the ignition: Park the vehicle safely, set the parking brake, and turn off the engine and ignition switch completely before plugging in equipment.
- Connect to the diagnostic port: Find the 16-pin diagnostic port under the driver-side dashboard. Push the scanner connector firmly onto the port until it seats securely.
- Turn the key to the run position: Turn the ignition key to the ON position without starting the engine. This wakes up the vehicle computer and powers the scanner.
- Navigate the menu to read codes: Select the diagnostic scan option on the main menu. Wait a few seconds while the scanner communicates with the control module.
- Write down all displayed codes: Record every alphanumeric code and description displayed on the scanner screen. This helps you research the underlying cause before starting repairs.
Some scanners also show the readiness monitors during this step. Readiness monitors track background self-tests performed by the vehicle computer on emissions equipment. Checking these monitors tells you whether your vehicle is prepared for an official state emissions inspection.
What Are Freeze-Frame Data and Pending Codes?
Freeze-frame data is a saved snapshot of engine conditions recorded when a fault triggers. Pending codes are unconfirmed potential faults detected by the computer. Both diagnostic features provide critical context for troubleshooting vehicle issues.
When a sensor detects an error severe enough to log a code, the computer captures real-time operating parameters. Reviewing freeze-frame data reveals engine speed, coolant temperature, vehicle speed, and fuel calculation parameters at the time of the failure. This information shows whether an engine misfire occurred during cold idling or while cruising at highway speeds.
Pending codes represent potential vehicle faults that the onboard computer has detected but not yet fully verified. The engine computer requires a fault to repeat across a set number of driving cycles before turning on the check engine light. If a sensor reports an abnormal reading during a single drive, the computer logs a pending code without illuminating the dashboard warning.
Checking for pending codes allows attentive drivers to identify developing mechanical issues before a full check engine light appears. If the issue resolves itself on subsequent trips, the pending code clears automatically. If the fault continues to repeat during future driving, the computer converts the pending code into a permanent stored code and lights the dashboard lamp.
Erasing codes with a scan tool or disconnecting the battery clears all stored trouble codes, freeze-frame snapshots, and pending codes simultaneously. Clearing codes also resets internal emissions readiness monitors back to an incomplete status. The vehicle will fail an emissions test until you complete sufficient driving cycles to allow the computer to retest all systems.
Which Codes Show Up Most Often?
Common diagnostic codes include powertrain misfire codes, catalyst efficiency warnings, intake air sensor errors, lean fuel trim codes, and evaporative emission leak codes. Vehicle computers generate these standardized generic codes whenever operational sensor readings cross factory thresholds.
Powertrain diagnostic codes begin with the letter P and represent the most frequent warning indicators on driver dashboards. Generic codes use a zero after the initial letter, while manufacturer-specific codes use a one. Network communication codes begin with the letter U and highlight signal interruption between internal control modules.
| Code | System | Plain meaning |
|---|---|---|
| P0300 | Powertrain | Random or multiple cylinder misfire detected |
| P0301 | Powertrain | Cylinder 1 misfire detected |
| P0303 | Powertrain | Cylinder 3 misfire detected |
| P0420 | Powertrain | Catalyst system efficiency below threshold |
| P0113 | Powertrain | Intake air temperature sensor circuit high input |
| P0171 | Powertrain | System too lean on bank 1 |
| P0455 | Powertrain | Evaporative emission system large leak detected |
| P0456 | Powertrain | Evaporative emission system small leak detected |
| P2000 | Powertrain | NOx catalyst efficiency below threshold |
| U0073 | Network | Control module communication bus off |
Reviewing these common diagnostic codes helps you narrow down mechanical issues quickly before starting repairs. Comparing code numbers against standard fault definitions prevents guessing and stops unnecessary component replacement.
For misfire codes, the final digit identifies the exact failing cylinder. For evaporative emission codes, the number distinguishes between large fuel vapor leaks and tiny pinhole leaks.
What Should You Do After You Read a Code?
After you read a diagnostic code, write down the fault numbers, visually inspect connected wiring, and systematically isolate root causes before replacing parts. Following a clear diagnostic plan prevents misdiagnosis and saves repair time.
Start by recording every stored trouble code and freeze-frame snapshot displayed on your scanner screen. Documenting these initial operating parameters preserves critical sensor data before any diagnostic clearing occurs.
Next, pop the hood and perform a visual inspection around the affected engine area. Inspect electrical connectors for loose fitment, backed-out pins, or green corrosion buildup. Look closely for cracked vacuum lines, frayed wiring harnesses, torn PCV hoses, or loose intake ducting.
Check live data streams on your scan tool if supported. Reviewing long-term fuel trim values, coolant temperatures, and intake airflow parameters helps spot sensor imbalances during idle.
If you encounter a single-cylinder misfire code, swap ignition components between cylinders to isolate the defective part. Move the suspect ignition coil to an adjacent working cylinder and retest. If the misfire follows the coil to the new cylinder, you have pinpointed the bad ignition coil.
If the misfire remains on the original cylinder, swap the spark plug next to verify spark condition. If the fault still persists, inspect the fuel injector connector and perform a cylinder compression test.
Always address circuit and wiring issues before purchasing replacement sensors. Many sensor codes stem from loose plugs or damaged ground wires rather than failed internal electronics.
Once physical repairs are complete, clear stored codes using your scan tool. Drive the vehicle under varied city and highway conditions to allow computer monitors to verify successful repairs.
Is It Safe to Keep Driving With the Check Engine Light On?
Driving short distances with a solid check engine light is safe, but you must stop driving immediately if the light flashes. Understanding warning light behavior helps you avoid catastrophic engine damage.
A solid yellow check engine light indicates a non-emergency sensor fault or minor emissions anomaly. The vehicle computer uses fallback operating parameters to keep the engine running safely. You can drive home or to a repair shop without immediate mechanical danger.
A rapidly flashing check engine light indicates a severe active engine misfire. Severe misfires dump raw unburned fuel directly into the hot exhaust stream. This unburned fuel ignites inside the catalytic converter, causing extreme heat that melts internal catalyst metals.
If your check engine light begins flashing, ease off the accelerator pedal immediately. Pull over safely and turn off the ignition to prevent catalyst destruction and expensive engine damage.
In severe fault conditions, the engine computer may trigger limp mode. Limp mode limits engine speed and vehicle acceleration to protect internal mechanical components from damage.
If both the check engine light and traction control light turn on together, the engine fault has disabled stability systems. Traction control systems rely on engine power management to control wheel slip. Resolving the core engine issue automatically restores traction control functionality.
Can You Read Codes Without a Scanner?
You can read diagnostic trouble codes without a standalone scanner on select vehicles by performing manual key cycling sequences or bridging diagnostic port terminals. Built-in diagnostic routines allow vehicle computers to display codes directly on dashboard screens.
On certain vehicles, turning the ignition key from OFF to ON three times within five seconds starts a manual code readout. Check your owner manual first, because the exact sequence differs by make. Leave the key in the ON position after the third cycle without cranking the starter. Stored trouble codes will appear in sequence on the digital odometer screen before displaying a completion message.
Some older first-generation vehicles let you jumper two specific terminals in the diagnostic connector to start a code readout. The terminals differ by make, so only do this if your owner manual or a repair manual shows exactly which two to use, and never on a 1996-or-newer OBD2 car. The check engine light will flash numerical pulse sequences, such as a code 12 indicating normal system operation.
While manual tricks reveal code numbers, they do not clear stored memory on most modern vehicles. Using a dedicated scan tool remains the most accurate method to read and erase diagnostic trouble codes.
What Mistakes Should You Avoid?
You should avoid six common mistakes when diagnosing vehicle trouble codes. Steering clear of these recurring diagnostic errors protects your vehicle and your wallet.
- Replacing components without checking wiring: Swapping new sensors without inspecting electrical harnesses for corroded pins or loose plugs wastes money and leaves faults unresolved.
- Clearing codes immediately before emissions testing: Erasing trouble codes resets internal readiness monitors to incomplete, causing automatic emissions test failures.
- Driving at high speeds during active misfires: Continuing to drive while the check engine light flashes causes unburned fuel to melt expensive catalytic converters.
- Disconnecting ignition wires on a running engine: Pulling high-voltage spark plug wires while the engine runs creates electrical arcs that destroy ignition control modules.
- Disconnecting the battery to clear codes: Disconnecting battery cables wipes saved freeze-frame history and erases radio presets without fixing mechanical problems.
- Overtightening small mounting bolts and spark plugs: Applying excessive torque strips delicate threads in aluminum cylinder heads and snaps tiny sensor mounting fasteners.
Frequently Asked Questions About OBD2 Codes
Do I Need a Scanner?
You need a diagnostic scanner to read specific trouble code numbers, view live sensor streams, and clear computer memory accurately. While some older vehicles display basic codes on odometers, standalone scanners provide the complete diagnostic data required for troubleshooting.
Can I Clear a Code Myself?
Yes, you can clear a diagnostic trouble code yourself using any standard plug-in code reader or wireless adapter. Selecting the clear codes menu option sends a reset command to the engine control module to extinguish the warning light.
Will Clearing the Code Fix the Problem?
No, clearing a diagnostic code only turns off the dashboard warning light and does not fix the underlying mechanical issue. If the mechanical fault remains uncorrected, the engine computer will log the error again and illuminate the light.
Why Did the Light Come Back?
The check engine light came back because your vehicle computer detected that the underlying mechanical or electrical fault persists. Vehicle computers continuously monitor sensor inputs during driving and re-illuminate warning lights when operating limits are exceeded.
What Does a Pending Code Mean?
A pending code means the vehicle computer logged an initial sensor fault that has not yet met the repetition threshold to illuminate the warning light. If the fault repeats during subsequent drive cycles, the computer converts the pending code into a permanent stored code.
Will It Pass an Emissions Test Right After Clearing?
No, your vehicle will not pass an emissions inspection immediately after clearing codes because all readiness monitors are reset to incomplete. You must drive the vehicle through a complete drive cycle under varied conditions to allow the computer to set monitors to ready.
Ready to pick a scanner? See our guide to the best OBD2 scanners for beginners.
Last reviewed: November 1, 2026.